Building and Sales Reconciliation Report
Reports > Transaction > Building and Sales Reconciliation
The Building and Sales Reconciliation report provides a summary of transactions for the selected building(s) and date(s).
Note: All revenues are local revenue only. The Building and Sales Reconciliation report does not include reimbursement.
-
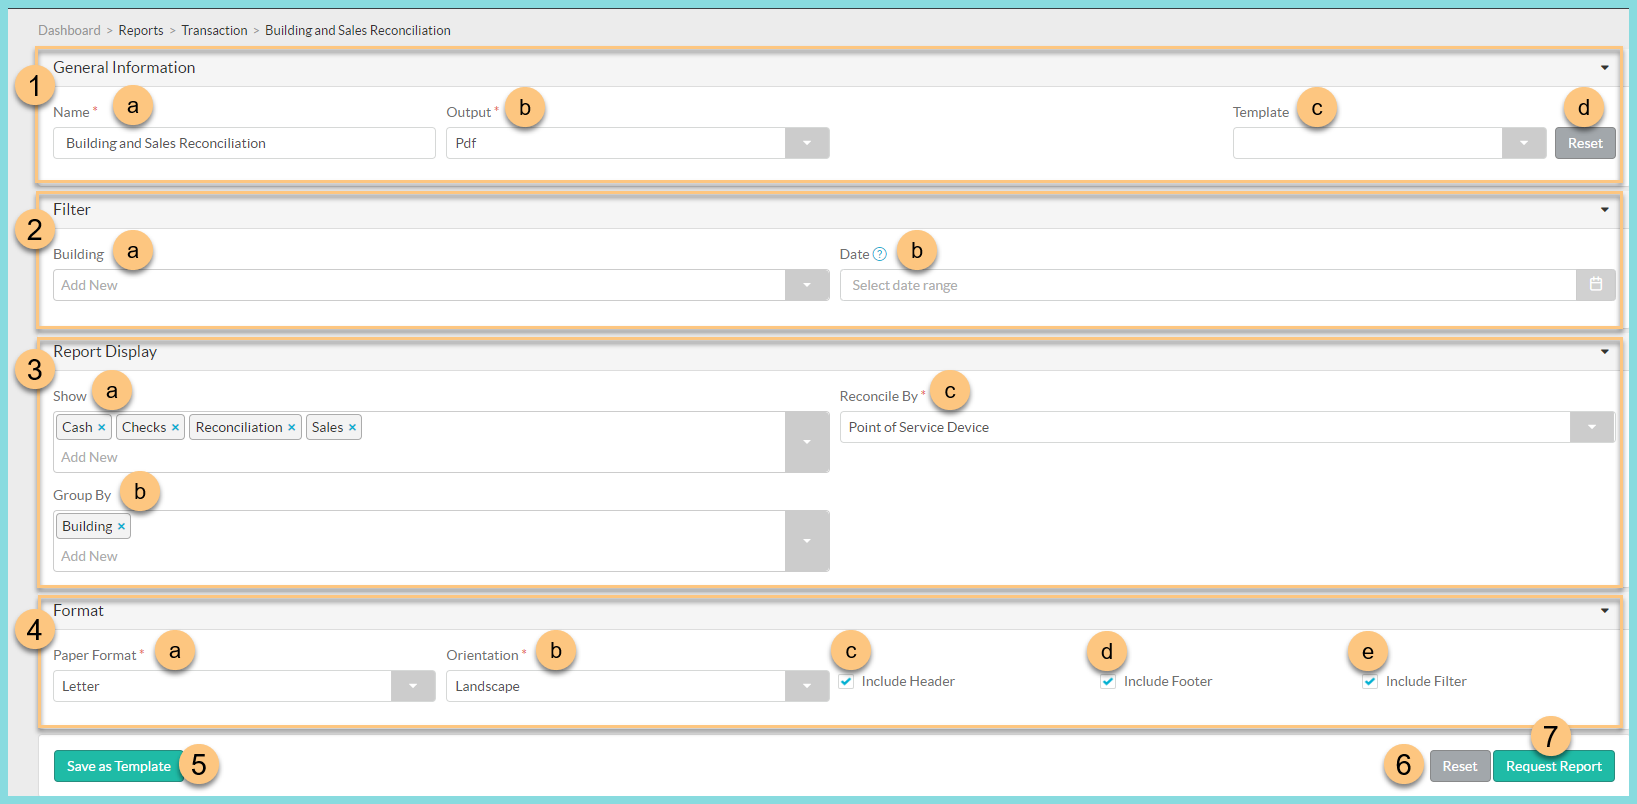
General Information: Select the report structure parameters.
-
Enter a Name for the report.
Default: Building and Sales Reconciliation -
Select the Output format (HTML or PDF).
Default: PDF -
Select a report Template if you would like to use the parameters of a previously configured report. Then skip to Step 7.
-
Click Reset to restore default selections.
-
-
Filter: Filter the report data.
-
Select a Building to filter transactions by building(s).
Note: If no building is selected, all buildings will be included. -
Select a Date range to filter by.
Note: If no date range is selected, the report will run for today's date.
-
-
Report Display: Choose the data configuration.
-
Show: Determine which selection(s) will appear in the report.
-
Cash: Each denomination, quantity, and dollar value counted in cash count.
-
Check: Each check.
-
Items: Each sales item, quantity, and local revenue organized by serving session.
-
Reconciliation: Each Reconcile By unit with associated expected revenue amounts.
-
Sales: Each person type and eligibility with quantity and local revenue listed by serving session.
Default: Cash, Checks, Reconciliation, and Sales.
-
-
Group By: Choose to separate the report by building or date if desired.
Default: Building -
Reconcile By: Choose the parameter by which the reconciliation is presented.
-
Building: Reconciles by building.
-
Cashier: Reconciles by cashier for the selected building(s) and date(s).
-
Cashier and Point of Service Device: Reconciles by each unique cashier and device combination.
-
Date: Reconciles by dates on which transactions occurred.
-
Point of Service Device: Reconciles by each POS device for the selected building(s).
Default: Point of Service Device
-
-
-
Format: Configure output formatting.
-
Select the Paper Format (CR80, Legal, or Letter).
Default: Letter -
Select the Orientation (Landscape or Portrait).
Default: Landscape -
Check Include Header to include the District Logo and report name.
-
Check Include Footer to include the date and time the report was requested, the number of pages, and the TITAN logo.
-
Check Include Filter to include the information selected in Step 2.
-
-
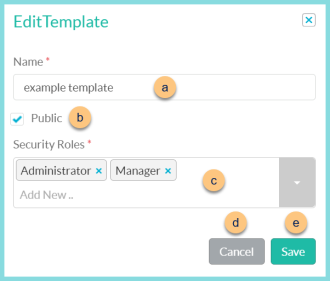
Click Save as Template to save the selected parameters as a template for future use.
-
Enter a template Name.
-
Check Public to make the template available for other users.
-
Select the Security Roles that can access the public template.
-
Click Cancel to return to the previous screen without saving this report as a template or
-
Click Save.
-
Click Reset to restore defaults.
-
Click Request Report to run the report. The report will appear in the bell icon when complete.
Report Format

-
Header: Notice the District Logo, Report Title, Serving Building Name, Date, and District Name.
-
Sales: Each person type and eligibility with quantity and local revenue listed by serving session.
-
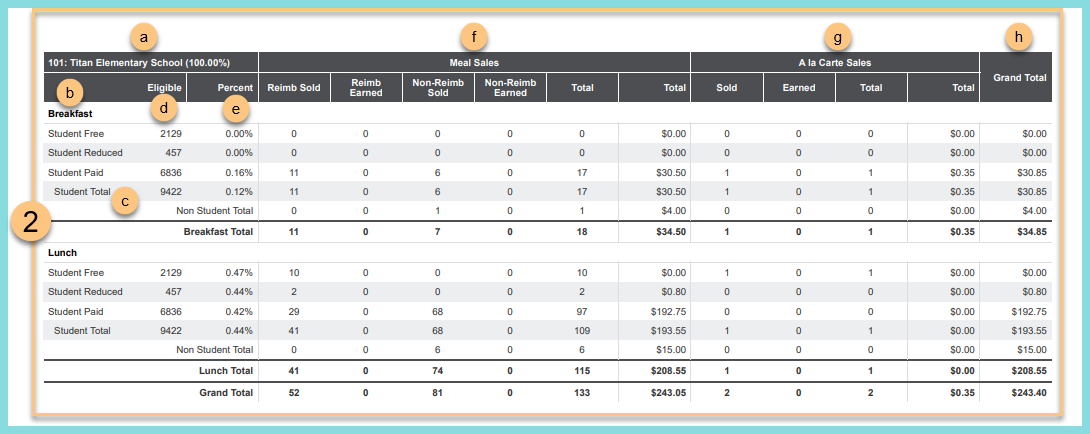
Building: Notice the building number, building name, and attendance factor.
-
Serving Session: Notice the data is broken down by serving session.
-
Notice the Student Free, Student Reduced, Student Paid, Student Total, Non Student Total, Serving Session Total, and Grand Total row headers.
-
Eligible: Notice the enrollment counts for each eligibility status and the student total enrollment for the serving building.
-
Percent: Notice the Percent Participation of each eligibility status and the student total.
Note: (Percent Participation = Reimbursable Sold / Eligible x 100%) -
Meal Sales: Notice the Reimbursable Sold, Reimbursable Earned, Non-Reimbursable Sold, Non-Reimbursable Earned, and Total meal counts and dollars for each row.
Note: The reimbursable columns will highlight in red for the rows in which the number served is higher than the enrollment times the attendance factor. -
A la Carte Sales: Notice the Sold, Earned, and Total counts, and the Total dollar value for each row.
-
Grand Total = Meal Sales Total Dollars + A la Carte Sales Total Dollars
-
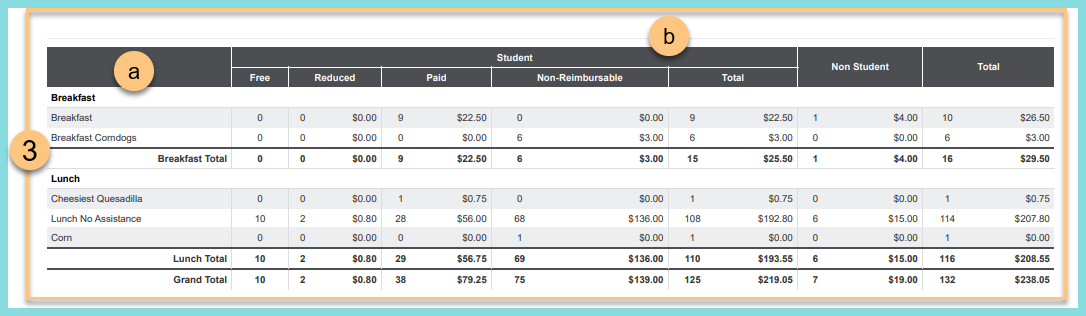
Items: Each sales item, quantity, and local revenue organized by serving session.
-
Notice the serving session. Notice the sales item name, serving session Total, and Grand Total row headers.
-
Notice the count and dollar value of items sold as Free, Reduced, and Paid reimbursable meals, Non-Reimbursable items, the student Total, non-student Total, and grand Total.
-
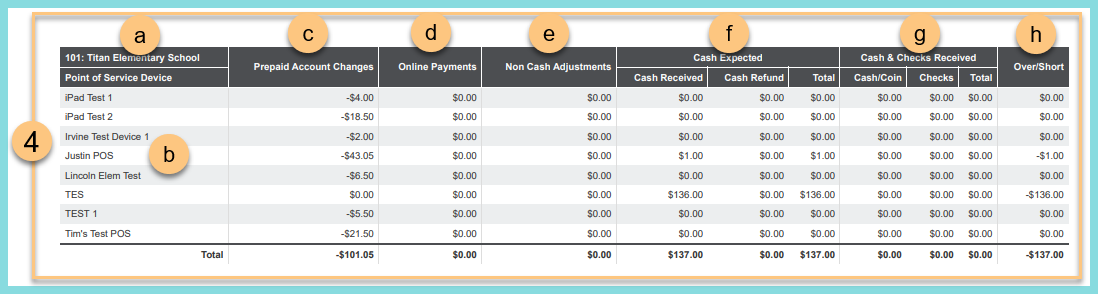
Reconciliation: Each Reconcile By unit with associated expected and received amounts.
-
Notice the building number and building name.
-
Notice the Reconcile By selection and the row header for each. Notice the total row header.
-
Prepaid Account Changes: Net changes of prepaid accounts assigned to building.
Note: Negative indicates that more money was spent than paid for the selected parameters. Positive indicates that more money was paid than spent. -
Online Payments: A total of online payments.
Note: Online Payments only show at the District Office unless the school is assigned to a payment processing group. -
Non Cash Adjustments: A total of balance adjustments and transfers
-
Cash Expected: Notice the sum of cash documented on POS or back office transactions as received, refunded, and the net total.
-
Cash & Checks Received: Notice the cash/coin, checks, and the total counted in the cash count.
-
Over/Short = Cash/Coin Received - Total Cash Expected
-
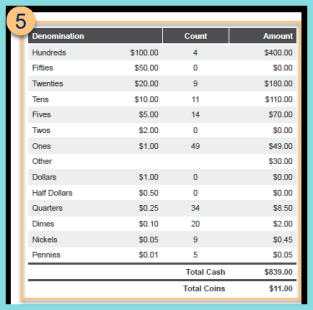
Cash Section: Notice the denomination name, dollar value, count, and amount. Notice the total cash and total coins.
-
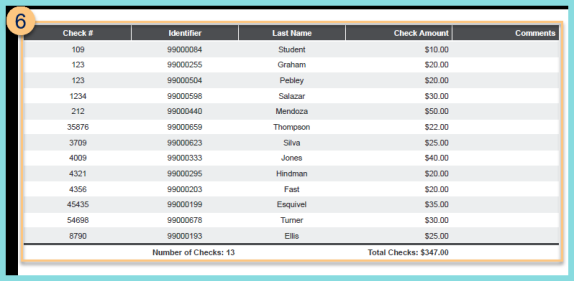
Checks Section - notice the Check Number, student Identifier, Last Name, Check Amount, and Comments for each check. Notice the Number of Checks and the Total Check amount.
-
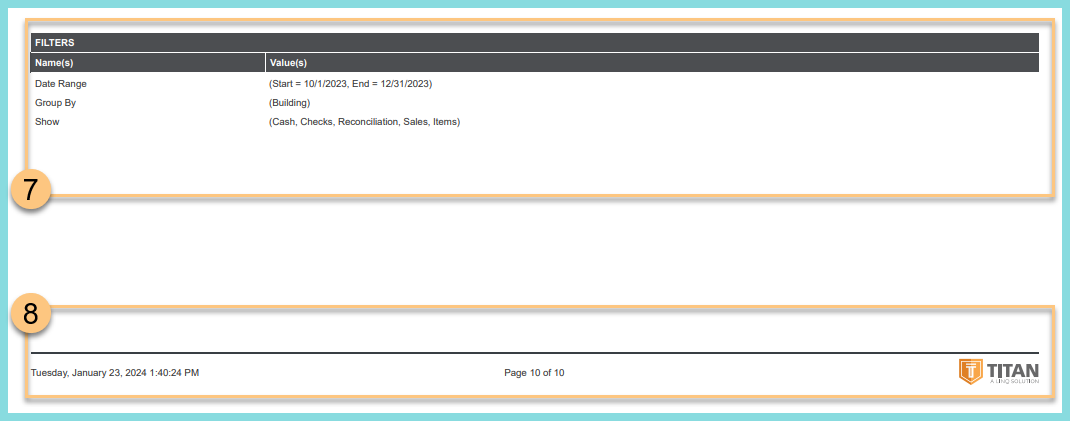
Filters: Notice the name(s) and value(s) of selected filters.
-
Footer - notice the date and time the report was requested, pages, and TITAN logo.